Two custom bowling hats can start from the identical blank cap and the identical logo and still look worlds apart, because the decoration method does most of the visual work. Flat embroidery, 3D puff, a woven or leather patch, and printing each render the same artwork differently, cost differently, and hold up differently on a hat that gets worn league night after league night. Picking the right one is less about taste than about matching the method to your specific logo and how the hats will be used. Here is how to make that call.
Start with the logo, not the method
Before you fall in love with a raised puff finish or a leather patch, look hard at your artwork. Count the colors, find the smallest piece of text, and notice any thin lines or gradients. Those three things eliminate options fast. A simple two-color team name in bold letters can be decorated almost any way you like. A detailed crest with fine linework, a shaded illustration, or a sponsor name in small type narrows the field to the methods that can actually hold detail. The most common regret in custom headwear is choosing a finish for its look and then watching it swallow the details that made the logo recognizable.
Flat embroidery: the durable default
Flat embroidery stitches the design directly into the cap in a single layer of thread, and for team and league hats it is the sensible default. It is the most durable finish, standing up to regular wear far better than a raised or printed alternative, and it handles a reasonable amount of detail. It works across cotton, poly, and structured caps alike. The cost is driven by stitch count, so the size and complexity of the mark set the price. A one-color block name typically runs somewhere around 2,000 to 5,000 stitches, a standard front-of-cap logo lands in the 5,000 to 10,000 range, and a detailed crest or badge can climb to 12,000 to 18,000. Industry retail decoration pricing tends to follow a per-thousand-stitch rate, commonly cited around one to three dollars per thousand stitches, on top of any setup or digitizing fee.
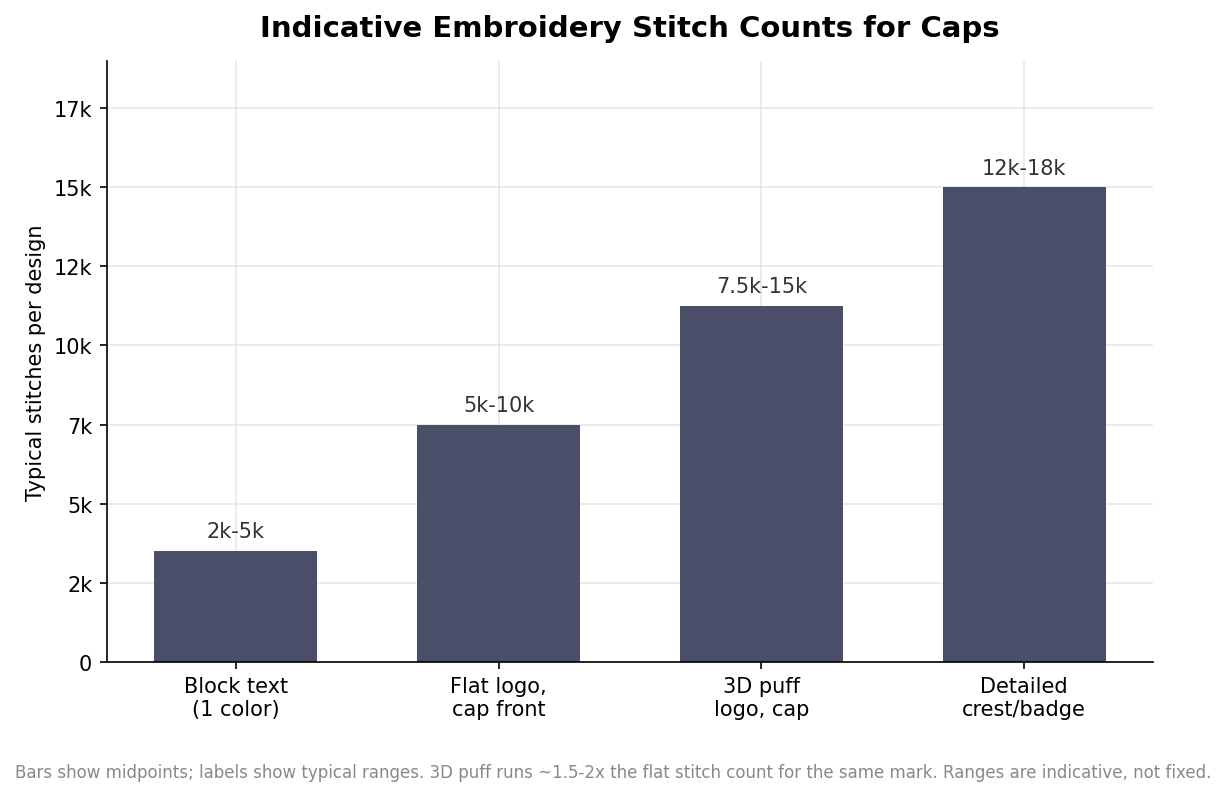
The practical takeaway is that stitch count, not the phrase “embroidered,” is what you are buying. If a quote seems high, the logo is probably stitch-heavy; simplifying background fills or dropping an outline can bring the count and the price down without hurting the mark at conversational distance.
When 3D puff earns its place
3D puff embroidery lays a foam under the thread so bold elements rise off the cap, the look you see on structured trucker and snapback caps. It reads as premium and grabs attention, which suits a big, simple team monogram or a chunky letterform. But it comes with real limits. Fine lines, intricate patterns, and small text do not translate well over foam, so puff is a poor choice for detailed crests or small sponsor names. It uses more thread, running roughly one and a half to two times the stitch count of the same design flat, so it costs more. And the raised stitching is somewhat more prone to snagging and wear than flat work, and it is not ideal on thin or delicate cap fabrics. Use puff for the bold headline element of a design and keep any fine detail flat.
Patches: woven, leather, and PVC
Patches decorate a separate piece that is then sewn or heat-applied to the cap front, which is why they are so flexible. A woven patch is made on a fine loom and holds sharp detail and multiple colors better than direct embroidery, making it the go-to when a logo is too intricate to stitch cleanly. A leather or faux-leather patch, usually laser-etched or debossed, gives the outdoorsy, premium look common on trucker caps and reproduces a mark in a single tonal color. A PVC or rubber patch is molded, weatherproof, and extremely durable, holding a clean three-dimensional shape that shrugs off moisture. Patches also give you consistency: because the artwork is produced separately and then applied, every hat in the run carries an identical mark, which is reassuring on a large team order.
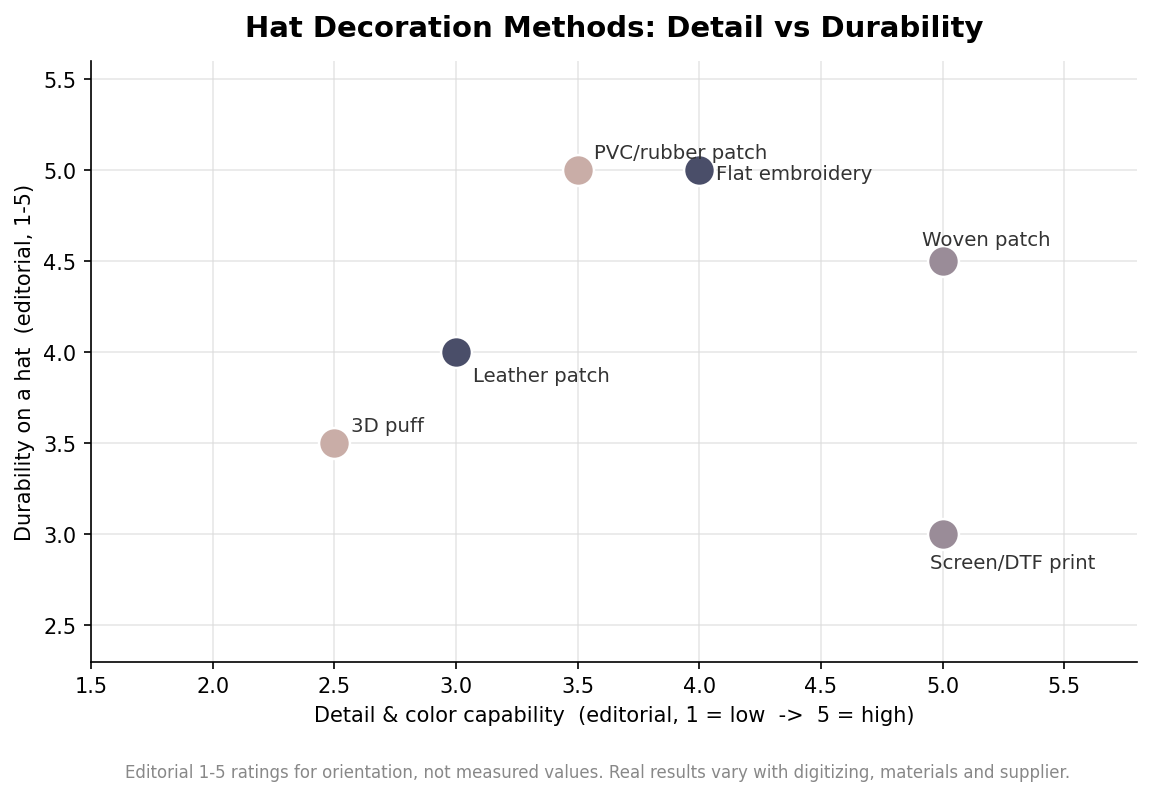
The chart places the methods by how much detail and color they hold against how well they survive on a working hat. Note that these are editorial orientation ratings rather than lab measurements, but they capture the tradeoffs most buyers care about: woven patches and flat embroidery sit high on both axes, printing holds the most detail but is the least rugged, and puff trades some durability and detail for its bold raised look.
When printing makes sense, and how to specify the order
Screen printing and heat-applied transfers such as DTF are the answer when a design needs full color, photographic imagery, or smooth gradients that thread and patches cannot reproduce. Printing shines on flat-bill and unstructured caps and on performance fabrics, and it is often the most economical route for a complex, colorful graphic. The tradeoff is feel and longevity; a printed finish generally will not match the premium hand or the wear life of a good embroidered cap, so weigh it against how long the hats need to last.
Whichever method you choose, three steps protect the order. First, have the artwork digitized or set up properly for the chosen method rather than sending a low-resolution logo and hoping. Second, mind minimum sizes: keep lettering bold and reasonably large for puff, and flag any text under roughly a quarter inch tall for embroidery so it can be adjusted before it turns to mush. Third, always approve a physical sew-out or a produced sample, not just an on-screen mockup, and lock the placement and thread or ink colors on that proof. Custom caps are commonly produced at minimums in the low dozens with a lead time of a few weeks plus freight, so the sample step costs you little and saves the whole run. Match the method to the logo, prove it on a real hat, and the cap becomes a piece of team identity people are happy to wear well beyond league night.